A better Rails debugger: ruby-debug

Just a few days ago, Kent Sibilev quietly released an amazing little plugin with far reaching consequences: ruby-debug. This is a marked improvement over Ruby’s own rdebug. The major difference is that he removed the major slow down that impacted rdebug usability with Ruby on Rails so it is blazing fast.

Instead of using the Kernel#set_trace_func API, which makes it possible to implement a debugger in Ruby, but has a negative effect on the speed on your program execution, he uses a native extension with a new hook using the Ruby C API

For each trace call Ruby interpreter creates a Binding object, even though it is not being used most of the time. ruby-debug library moves most of the functionality of debug.rb to a native extension, this way significantly improving the execution of your program.

This means that watchpoints and the standard tracing facility are not supported, but I’m gladly giving that up for the comfort and speed. And if you are wondering how the speed is, that is really the difference between utter frustration each time you debug something to bliss!

Previously I covered some options for Debugging in Rails. This is going to become my preferred option by far, and I’m willing to bet this will become yours too. Why? Because you can see the source code of where you are, you can execute step while watching some or your variables, you can inspect of your variables (this you could do with breakpointer), you can use conditional breakpoints, you can get a list of expressions to be displayed every time you step. The downside compared to breakpointer? You can’t do it remotely, which in most instances, as best as I can tell, is not going to be a problem at all.

Installation

Ruby-debug comes as a gem so to install, just run:

sudo gem install ruby-debug

Make sure you chose the proper windows or ruby version depending on your platform.

Using ruby-debug

To use in your rails application, assuming you want this to only be available in development mode (this is not such a great idea to leave in in production mode, just in case you forget to remove the breakpoints, and also for performance reasons as I’ll explain in a bit)

In environement.rb add the following:

SCRIPT_LINES__ = {} if ENV['RAILS_ENV'] == 'development'

This line is important if you want to be able to see your source code. SCRIPT_LINES__ is an obscure feature of the ruby interpreter. If it is defined, it will store all loaded ruby file in a hash, which debug-ruby will use to display where you are in your source code. The only problem is that it can have some impact on performance, and worst of all, use up quite a bit of memory, which is not so good in production (hence the “if ENV[‘RAILS_ENV’] == ‘development'”). SCRIPT_LINES__ needs to be initialized as early as possible so it can capture all loaded ruby files.

To add a breakpoint, you will need to use:

require 'ruby-debug'
...
def your_method
  ...
  debugger if ENV['RAILS_ENV] == 'development'
  ...
end

Then start your app using webrick (it does not work with lighttpd and I have not investigated why just yet):

script/server webrick

When the code hits the breakpoint, you are in a console like mode (not unlike irb or script/console).

Ruby-debug commands

  • b[reak]
    list breakpoints
  • b[reak] [file|class:]LINE|METHOD [if expr]
  • b[reak] [class.]LINE|METHOD [if expr]
    set breakpoint to some position, optionally if expr == true
  • cat[ch]
    show catchpoint
  • cat[ch] EXCEPTION
    set catchpoint to an exception
  • disp[lay] EXPRESSION
    add expression into display expression list
  • undisp[lay][ nnn]
    delete one particular or all display expressions if no expression number given
  • del[ete][ nnn]
    delete some or all breakpoints (get the number using “break”)
  • c[ont]
    run until program ends or hit breakpoint
  • r[un]
    alias for cont
  • s[tep][ nnn]
    step (into methods) one line or till line nnn
  • n[ext][ nnn]
    go over one line or till line nnn
  • w[here]
    displays stack
  • f[rame]
    alias for where
  • l[ist][ (-|nn-mm)]
    list program, – list backwards, nn-mm list given lines. No arguments keeps listing
  • up[ nn]
    move to higher frame
  • down[ nn]
    move to lower frame
  • fin[ish]
    return to outer frame
  • q[uit]
    exit from debugger
  • v[ar] g[lobal]
    show global variables
  • v[ar] l[ocal]
    show local variables
  • v[ar] i[nstance] OBJECT
    show instance variables of object
  • v[ar] c[onst] OBJECT
    show constants of object
  • m[ethod] i[nstance] OBJECT
    show methods of object
  • m[ethod] CLASS|MODULE
    show instance methods of class or module
  • th[read] l[ist]
    list all threads
  • th[read] c[ur[rent]]
    show current thread
  • th[read] [sw[itch]] nnn
    switch thread context to nnn
  • th[read] stop nnn
    stop thread nnn
  • th[read] resume nnn
    resume thread nnn
  • p EXPRESSION
    evaluate expression and print its value
  • pp EXPRESSSION
    evaluate expression and print its value
  • h[elp]
    print this help
  • RETURN KEY
    redo previous command. Convenient when using list, step, next, up, down,
  • EVERYHTING ELSE
    evaluate

Happy debugging!

Installing Rails on Mac OS X Tiger

2/23/07 update: some things have changed since I wrote this page, either in MacOS itself, or the components referenced. So before you start, be sure to also check a recent update for 10.4.8 and the comments of both pages that contain some valuable information.
If something still does not work, please leave a comment and someone will help you.

I recently Switched back to a Mac, while other long time Mac users are switching to Linux. And I love every minute of it! Once I got the basic stuff going, it was time to install a fitting Ruby on Rails environment on my new iMac.

There are a number of approaches you can use (see the reference section at the bottom). I was after installing an environment as close as one you can use in production, but right here on my desk.

If you are only looking for the basics, Locomotive is probably what you need, if you want a grown-up rails setup on Mac OS Tiger, read on.

Choosing an install method

There are 3 approaches to installing Ruby on Rails on Mac OS Tiger.

You can use the one click approach, and Locomotive is probably the simplest. My main issue is that it is a bit too opaque and if you want to patch anything, upgrade one one the component, you might be out of luck.

You can use the “compile everything from source approach”, and Hivelogic covers this well. This is an approach you might prefer except that you may run into Mac specific issues not covered by typical Unix/Linux code

A third option is to rely on Darwin ports as covered by Evan with “a better way of building ruby, rails, lighttpd, mysql, and postgres on OS X tiger

This third method gets my vote: less opaque, but a large number of smart and dedicated people have already worked out all the problems.

So with that covered, let’s get on with that “grow-up setup” (thanks Coda!). Hmm OK, just one last word of warning before you begin. I’ve installed more than the bare minimum. If you follow these directions, you’ll be all set for standalone lighttpd , standalone mongrel, apache, rails with mongrel and a few more combinations. I haven’t got to using pound just yet, so we’ll keep this for some other time.

Installation on Tiger

If you have not installed Darwin port, now is the time.
Then update port itself

sudo port -d selfupdate

Fix the root path and set the PATH variable in /etc/profile. You may not need this is you are not going to run things as root. Although this will simplify a few things for you.

mate /etc/profile    #fill free to use vi or any other editor you’d like
PATH=”/opt/local/bin:/opt/local/sbin:/bin:/sbin:/usr/bin:/usr/sbin”

Install Apache 2

sudo port install apache2

Create a default configuration for apache

cd /opt/local/apache2/conf
cp httpd.conf.sample httpd.conf

Start Apache

sudo launchctl load -w /Library/LaunchDaemons/org.darwinports.apache2.plist

Rebooting would do the trick too. At this point you should have a “It works!” if you point a browser to http://localhost

Install fcgi (not really going to use it, so it is a just in case so I can benchmark it at some point)

sudo port install fcgi

Install lighttpd

sudo port install lighttpd +ssl

Install mysql 5

sudo port install mysql5 +server

start mysql 5 (you can also reboot)

sudo launchctl load -w /Library/LaunchDaemons/org.darwinports.mysql5.plist

Change the mysql root password (on localhost AND on your network card)

/opt/local/lib/mysql5/bin/mysqladmin -u root password ‘new-password’
/opt/local/lib/mysql5/bin/mysqladmin -u root -h [HOSTNAME] password ‘new-password’

Check it works (empty password if you have not set it)

mysql5 -u root -p

Install subversion

sudo port install subversion +mod_dav_svn +tools

Install ruby and a few goodies

#ruby
sudo port install ruby
sudo port install rb-rubygems
sudo port install rb-termios
sudo port install rb-fcgi
sudo port install rb-mysql5
sudo port install imagemagick

Install Apache mod_fcgi module

sudo port install mod_fastcgi

add the following line to /opt/local/apache2/conf/httpd.conf

LoadModule fastcgi_module modules/mod_fastcgi.so”

Install gems you can’t live without

sudo gem install -y rake
sudo gem install -y rails
sudo gem install -y capistrano
sudo gem install daemons gem_plugin mongrel mongrel_cluster –include-dependencies
sudo gem install rmagick

One good gem to have would be sendfile to avoid copying data between apache and mongrel for example, but the Tiger kernel does not support it despite having the function defined in the C header files. So since it is not really a production machine, we can live without it.

At this point, you’ve got more that the basic setup for Ruby on Rails. That was no too bad, wasn’t it? Although arguably, this could be easier!

Deploying a rails application: Mephisto

For good measure, just to check that our setup is all good, let’s install Mephisto. The latest Rails blog engine.

Create the databases

mysqladmin5 -u root create mephisto_development
mysqladmin5 -u root create mephisto_test
mysqladmin5 -u root create mephisto_production

Checkout everything

svn co http://svn.techno-weenie.net/projects/mephisto/trunk mephisto

Configure the database (should be the right default)

cd mephisto/config
cp database.example.yml database.yml
mate database.example #to check that the database name are what we created

Populate the database

rake RAILS_ENV=production db:bootstrap

And start. Since lighttpd is installed, that’s what it is using

script/server

Point your browser to http://localhost:3000 and yes! It works :D
Or you can go to http://localhost:3000/admin (using admin/test for user/password)

Now let’s finish our “grown up setup” and configure mongrel cluster

mongrel_rails cluster::configure -e production -p 8000 -a 127.0.0.1 -N3 -c [RAILS_ROOT of mephisto]

a few note on Capistrano

My initial Capistano Cheat Sheet should be enough with one exception. SSH is not enabled by default on Tiger. To enable, use the “Sharing” panel under System Preferences and enable “Remote Login”.

And second, if you have trouble when running via ssh, you may need to fix ssh PATH. To do that, create a file under ~/.ssh/environment with:

PATH=/opt/local/bin:/opt/local/sbin:/opt/local/apache2/bin:/bin:/sbin:/usr/bin:/usr/sbin

Run Mongrel Cluster as a service

Now let’s configure Mongrel Cluster to start at boot time

sudo mkdir /etc/mongrel_cluster
ln -s [YOUR RAILS_ROOT]/config/mongrel_cluster.yml /etc/mongrel_cluster/[your application].yml

Create a file ~/Library/LaunchAgents/mongrel_cluster.plist

<?xml version="1.0" encoding="UTF-8"?>
<!DOCTYPE plist PUBLIC "-//Apple Computer//DTD PLIST 1.0//EN" "http://www.apple.com/DTDs/PropertyList-1.0.dtd">
<plist version="1.0">
<dict>
        <key>Debug</key>
        <true/>
        <key>Label</key>
        <string>org.rails.mongrel.cluster</string>
        <key>OnDemand</key>
        <false/>
        <key>Program</key>
        <string>/opt/local/bin/daemondo</string>
        <key>ProgramArguments</key>
        <array>
                <string>&#8211;label=mongrel_cluster</string>
                <string>&#8211;start-cmd</string>
                <string>/opt/local/bin/mongrel_cluster_ctl</string>
                <string>start</string>
                <string>-v</string>
                <string>-c</string>
                <string>/etc/mongrel_cluster/</string>
                <string>;</string>
                <string>&#8211;stop-cmd</string>
                <string>/opt/local/bin/mongrel_cluster_ctl</string>
                <string>stop</string>
                <string>-v</string>
                <string>-c</string>
                <string>/etc/mongrel_cluster/</string>
                <string>;</string>
                <string>&#8211;restart-cmd</string>
                <string>/opt/local/bin/mongrel_cluster_ctl</string>
                <string>restart</string>
                <string>-v</string>
                <string>-c</string>
                <string>/etc/mongrel_cluster/</string>
                <string>;</string>
                <string>&#8211;pid=none</string>
        </array>
        <key>RunAtLoad</key>
        <true/>
        <key>StandardErrorPath</key>
        <string>/tmp/mongrel.log</string>
        <key>StandardOutPath</key>
        <string>/tmp/mongrel.log</string>
</dict>
</plist>

Additionally, if you did not want to modify /etc/profile, you can add:

    <key>EnvironmentVariables</key>
    <dict>
        <key>PATH</key><string>/opt/local/bin:/opt/local/sbin:/bin:/sbin:/usr/bin:/usr/sbin</string>
    </dict>

And finally, you can start mongrel cluster. or logging in will work:

sudo launchctl load -w ~/Library/LaunchAgents/mongrel_cluster.plist

To have it work at boot time, you will need to put mongrel_cluster.plist under /Library/LaunchDaemons instead.

References

lighttpd

http://duncandavidson.com/essay/2005/12/railsonlighty
http://duncandavidson.com/essay/2006/01/railsvhostingonlighty

Rails installation

rails with postgres on tiger using Darwin Ports
Lighttpd with rails on tiger
Time For A Grown-Up Server: Rails, Mongrel, Apache, Capistrano and You
Rails installation from single script
Locomotive, one click rails installer for Mac OS X

pound

pound + lighttpd + mongrel

10/17/06 update: I’ve reinstalled on a brand new system with Mac OS 10.4.8. See my notes on what has changed.

textmate rails cheat sheets

I’m just discovering TextMate and I have to say I’m impressed! For those of you who don’t know me, it takes quite a bit for me to admit that I’m impressed.

Over the years, I’ve used quite a few editors, and I happen to think that vi is one the greatest. Hmmm, I can see some eyebrows perking up, and most of you starting to think that I’m weird, either because you’ve never heard of vi, or because you’ve learned to hate it. But I like it because it is dead simple (once you are over the initial learning curve), has powerful regexp, and gets the job done. And once you’ve learned it, that is the kind of thing you don’t forget. I’ve liked emacs at some point, but it is way too heavy, and after a few years of not using it, you’ve got to learn it all over again, but I digress…

Back to TextMate. I’ve not used it much yet, but I love the concepts. Lots of keyboard action (the mouse is great, but going back and forth between mouse and keyboard can be a drag (pun intended!)). And it has very powerful macros that look easy to customize. Give me more!

So I went out I looked for quick ways to get started. I found a couple of interesting cheat sheet that I’d like to share with you. If you know of any other, please let me know!

The first rails textmate cheat sheet is by Sebastien Friedrich and documents the snippets (a.k.a. tab triggers) from the TexMate Rails Bundle (by syncPEOPLE. (via O’Reilly Ruby)

The second is TextMate Cheat Sheet for Rails Hackers is provided by Pragmatic Studio and includes some of the same information, plus some more general textmate shortcuts useful with Rails (via Tim Kuntz).

The third is TEXTMATE cheat sheet and is a more general purpose guide to the shortcuts of TextMate. (via macromates).

And while I’m on the subject of Cheat Sheet, here are 2 bonus rails and ruby Cheat Sheets:

With all 5, you should be all set!

TextLinkAds Typo Sidebar Plugin

Based on “Displaying ads from TextLinkAds in a rails application”, here’s the first release of my typo sidebar plugin to display ads from TextLinkAds. The plugin uses typo built-in caching as I explained before.

Download

Download either textlinkadssidebar.zip or textlinkadssidebar.tgz.

Installation

Unzip (unzip textlinkadssidebar.zip) or untar (tar xzvf textlinkadssidebar.tgz) directly into the components/sidebars/ directory of your typo installation.

Configuration

Using the sidebar tab of the admin section of typo, you’ll find an Item named “Text-Link-Ads” on the left hand side.
Simply drag it to the right side where at the desired location (the higher the better!).
Enter a title for that section (here I use nanoRAILS Sponsors).
Fill in your XML KEY from the “Get ad code” section on TextLinkAds.
Enter your affiliate ID (so you can get paid for referrals).
Enter the text for the referral link (I have “Advertise on nanoRails”).
Click on the Publish Changes button.
Once you refresh your blog, you will have a TextLinkAds section.

Text Link Ads

6/15/06 update: to use in the trunk of typo (1055 currently), you will need textlinkadssidebar-1055.zip or textlinkadssidebar-1055.tgz.

The short of it is that sidebar plugins have changed quite a bit! You may be better off recreating from scratch using one of the available ones.

The longer story is that you no longer need a configure.rhtml. Instead, you use the setting helper to describe each setting. You need to subclass Sidebars::ComponentPlugin instead of Sidebars::Plugin. You also need to remove the configure method and the way you specify the display name and and the description is also done with a helper.

Oh yeah, the file content.rhtml is unchanged :D

Rails 1.1 Reference sheet

Courtesy of InVisible, here is an exhaustive Ruby on Rails 1.1 Cheat Sheet. I’ve added a copy of it here so I know where to find it: Rails 1.1 Cheat Sheet. There is also a PDF version available.

It covers everything from the basics, generators, scaffolds, models, controllers, views (including AJAX), and configuration.

Check it out!

Rails 1.1 Cheat Sheet

Ruby on Rails 1.1 Reference

Create a rails application

$ rails app_name

Options:

  • -d, –database=xxx specify which database to use (mysql oracle postgresql sqlite2 sqlite3 ), defaults to mysql
  • -r, –ruby-path= specify the path to ruby, if not set, the scripts use env to find ruby
  • -f, –freeze freezes Rails into the vendor/rails directory

API Documentation

$ gem_server

Open a web browser with the address localhost:8088

Rake

is the make of ruby – the R uby m AKE. Rails defines a number of tasks to help you:

rake db:fixtures:load          # Load fixtures into the current environment&#8217;s database.
                               # Load specific fixtures using FIXTURES=x,y
rake db:migrate                # Migrate the database through scripts in db/migrate. Target
                               # specific version with VERSION=x
rake db:schema:dump            # Create a db/schema.rb file that can be portably used against
                               # any DB supported by AR
rake db:schema:load            # Load a schema.rb file into the database
rake db:sessions:clear         # Clear the sessions table
rake db:sessions:create        # Creates a sessions table for use with
                               # CGI::Session::ActiveRecordStore
rake db:structure:dump         # Dump the database structure to a SQL file
rake db:test:clone             # Recreate the test database from the current environment&#8217;s
                               # database schema
rake db:test:clone_structure   # Recreate the test databases from the development structure
rake db:test:prepare           # Prepare the test database and load the schema
rake db:test:purge             # Empty the test database

rake doc:app                   # Build the app HTML Files
rake doc:clobber_app           # Remove rdoc products
rake doc:clobber_plugins       # Remove plugin documentation
rake doc:clobber_rails         # Remove rdoc products
rake doc:plugins               # Generate documation for all installed plugins
rake doc:rails                 # Build the rails HTML Files
rake doc:reapp                 # Force a rebuild of the RDOC files
rake doc:rerails               # Force a rebuild of the RDOC files

rake log:clear                 # Truncates all *.log files in log/ to zero bytes

rake rails:freeze:edge         # Lock this application to latest Edge Rails. Lock a specific
                               # revision with REVISION=X
rake rails:freeze:gems         # Lock this application to the current gems (by unpacking them
                               # into vendor/rails)
rake rails:unfreeze            # Unlock this application from freeze of gems or edge and return
                               # to a fluid use of system gems
rake rails:update              # Update both scripts and public/javascripts from Rails
rake rails:update:javascripts  # Update your javascripts from your current rails install
rake rails:update:scripts      # Add new scripts to the application script/ directory

rake stats                     # Report code statistics (KLOCs, etc) from the application

rake test                      # Test all units and functionals
rake test:functionals          # Run tests for functionalsdb:test:prepare
rake test:integration          # Run tests for integrationdb:test:prepare
rake test:plugins              # Run tests for pluginsenvironment
rake test:recent               # Run tests for recentdb:test:prepare
rake test:uncommitted          # Run tests for uncommitteddb:test:prepare
rake test:units                # Run tests for unitsdb:test:prepare

rake tmp:cache:clear           # Clears all files and directories in tmp/cache
rake tmp:clear                 # Clear session, cache, and socket files from tmp/
rake tmp:create                # Creates tmp directories for sessions, cache, and sockets
rake tmp:sessions:clear        # Clears all files in tmp/sessions
rake tmp:sockets:clear         # Clears all ruby_sess.* files in tmp/sessions

Scripts

script/about            # Information about environenment
script/breakpointer     # starts the breakpoint server
script/console          # interactive Rails Console
script/destroy          # deletes files created by generators
script/generate         # -> generators
script/plugin           # -> Plugins
script/runner           # executes a task in the rails context
script/server           # launches the development server
                        # http://localhost:3000

script/performance/profiler     # profile an expenive method
script/performance/benchmarker  # benchmark different methods

script/process/reaper
script/process/spawner

Generators

ruby script/generate model ModellName
ruby script/generate controller ListController show edit
ruby script/generate scaffold ModelName ControllerName
ruby script/generate migration AddNewTable
ruby script/generate plugin PluginName
ruby script/generate mailer Notification lost_password signup
ruby script/generate web_service ServiceName api_one api_two
ruby script/generate integration_test TestName
ruby script/generate session_migration

Options

-p, &#8211;pretend                    Run but do not make any changes.
-f, &#8211;force                      Overwrite files that already exist.
-s, &#8211;skip                       Skip files that already exist.
-q, &#8211;quiet                      Suppress normal output.
-t, &#8211;backtrace                  Debugging: show backtrace on errors.
-h, &#8211;help                       Show this help message.
-c, &#8211;svn                        Modify files with subversion. (Note: svn must be in path)

Plugins

script/plugin discover          # discover plugin repositories
script/plugin list              # list all available plugins
script/plugin install where     # install the „where“ plugin
script/plugin install -x where  # install where plugin as SVN external
script/plugin install http://invisible.ch/projects/plugins/where
script/plugin update            # update installed plugins
script/plugin source            # add a source repository
script/plugin unsource          # removes a source repository
script/plugin sources           # lists source repositories

A searchable directory of plugins can be found at AgileDevelopment.

Models

Model Relations

There are four ways of associating models. has_one, has_many, belongs_to and has_and_belongs_to_many

Assocs

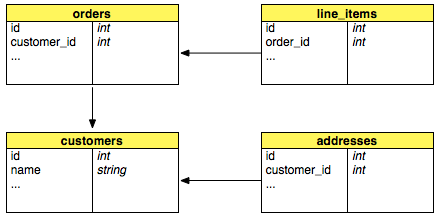
def Order < ActiveRecord::Base
  has_many :line_items
  belongs_to :customer   # there's a column "customer_id" in the db table
end

def LineItem < ActiveRecord::Base
  belongs_to :order # there's a column "order_id" in the db table
end

def Customer < ActiveRecord::Base
  has_many :orders
  has_one :address
end

def Address < ActiveRecord::Base
  belongs_to :customer
end

belongs_to  :some_model,
        :class_name  => &#8216;MyClass&#8217;,      # specifies other class name
        :foreign_key => &#8216;my_real_id&#8217;,   # and primary key
        :conditions  => &#8216;column = 0&#8217;    # only finds when this condition met

has_one :some_model,
        # as belongs_to and additionally:
        :dependent   => :destroy        # deletes associated object
        :order       => &#8216;name ASC&#8217;      # SQL fragment for sorting

has_many :some_model
        # as has_one and additionally:
        :dependent => :destroy          # deletes all dependent data
                                        # calling each objects destroy
        :dependent => :delete_all       # deletes all dependent data
                                        # without calling the destroy methods
        :dependent => :nullify          # set association to null, not
                                        # destroying objects
        :group => &#8216;name&#8217;                # adds GROUP BY fragment
        :finder_sql => &#8216;select &#8230;.&#8217;    # instead of the Rails finders
        :counter_sql => &#8216;select &#8230;&#8217;    # instead of the Rails counters

Habtm

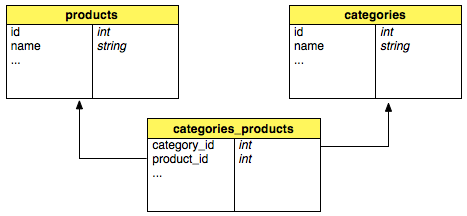
def Category < ActiveRecord::Base
  has_and_belongs_to_many :products
end
def Product < ActiveRecord::Base
  has_and_belongs_to_many :categories
end

Table categories_products with category_id and product_id (without id column)

Association Join Models

Through Model

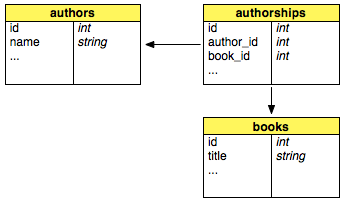
class Author < ActiveRecord::Base
  has_many :authorships
  has_many :books, :through => :authorships
end

class Authorship < ActiveRecord::Base
  belongs_to :author
  belongs_to :book
end

class Book < ActiveRecord::Base
  has_one :authorship
end

@author = Author.find :first
@author.authorships.collect { |a| a.book } # selects all books that the author's
                                           # authorships belong to.
@author.books                              # selects all books by using the Authorship
                                           # join model

Also works through has_many associations:

class Firm < ActiveRecord::Base
  has_many   :clients
  has_many   :invoices, :through => :clients
  has_many   :paid_invoices, :through => :clients, :source => :invoice
end

class Client < ActiveRecord::Base
  belongs_to :firm
  has_many   :invoices
end

class Invoice < ActiveRecord::Base
  belongs_to :client
end

@firm = Firm.find :first
@firm.clients.collect { |c| c.invoices }.flatten # select all invoices for all clients
                                                 # of the firm
@firm.invoices                                   # selects all invoices by going through
                                                 # the Client join model.

Validations

validates_presence_of :firstname, :lastname     # must be filled out

validates_length_of :password,
                    :minimum => 8           # more than 8 characters
                    :maximum => 16          # shorter than 16 characters
                    :in => 8..16            # between 8 and 16 characters
                    :too_short => &#8216;way too short&#8217;
                    :too_long => &#8216;way to long&#8217;

validates_acceptance_of :eula               # Must accept a condition
                        :accept => &#8216;Y&#8217;      # default: 1 (ideal for a checkbox)

validates_confirmation_of :password
# the fields password and password_confirmation must match

validates_uniqueness_of :user_name              # user_name has to be unique
                        :scope => &#8216;account_id&#8217;  # Condition:
                                                # account_id = user.account_id

validates_format_of :email          # field must match a regular expression
                    :with => /^([^@\s]+)@((?:[-a-z0-9]+&#46;)+[a-z]{2,})$/i

validates_numericality_of   :value                  # value is numeric
                            :only_integer => true
                            :allow_nil => true

validates_inclusion_in  :gender,    # value is in enumeration
                        :in => %w( m, f )

validates_exclusion_of  :age            # value is not in Enumeration
                        :in => 13..19   # don&#8217;t want any teenagers

validates_associated :relation
# validates that the associated object is valid

Options for all validations above:

:message => &#8216;my own errormessage&#8217;   # eigene Fehlermeldung
:on      => :create                 # or :update (validates only then)
:if      => &#8230;                     # call method oder Proc

Calculations

Person.average :age
Person.minimum :age
Person.maximum :age
Person.sum :salary, :group => :last_name

Find

find(42)        # object with ID 42
find([37, 42])  # Array with the objects with id 37, 42
find :all
find :first,
     :conditions => [ &#8220;name = ?&#8221;, &#8220;Hans&#8221; ]   # finds the first record with
                                             # the matching condition

more parameters for find:

:order => &#8216;name DESC&#8217;       # sql fragment for sorting
:offset => 20               # starts with entry 20
:limit => 10                # only return 10 objects
:group => &#8216;name&#8217;            # sql fragment GROUP BY
:joins => &#8216;LEFT JOIN &#8230;&#8217;   # additional LEFT JOIN (rarely used)
:include => [:account, :friends]    # LEFT OUTER JOIN with these model
:include => { :groups => { :members=> { :favorites } } }
:select => [:name, :adress]     # instead of SELECT * FROM
:readonly => true               # objects are write protected

Scope

Developer.with_scope(:find => { :conditions => &#8220;salary > 10000&#8221;, :limit => 10 }) do
  Developer.find(:all)     # => SELECT * FROM developers WHERE (salary > 10000) LIMIT 10

  # inner rule is used. (all previous parameters are ignored)
  Developer.with_exclusive_scope(:find => { :conditions => &#8220;name = &#8216;Jamis&#8217;&#8221; }) do
    Developer.find(:all)   # => SELECT * FROM developers WHERE (name = &#8216;Jamis&#8217;)
  end

  # parameters are merged
  Developer.with_scope(:find => { :conditions => &#8220;name = &#8216;Jamis&#8217;&#8221; }) do
    Developer.find(:all)   # => SELECT * FROM developers WHERE
                           # (( salary > 10000 ) AND ( name = &#8216;Jamis&#8217; )) LIMIT 10
  end
end

for more details and examples, see:

Callbacks

During the life cycle of an active record object, you can hook into 9 events:

  • (-) save
  • (-) valid?
  • (1) before_validation
  • (2) before_validation_on_create
  • (-) validate
  • (-) validate_on_create
  • (4) after_validation
  • (5) after_validation_on_create
  • (6) before_save
  • (7) before_create
  • (-) create
  • (8) after_create
  • (9) after_save

Examples:

class Subscription < ActiveRecord::Base
  before_create :record_signup
private
  def record_signup
    self.signed_up_on = Date.today
  end
end

class Firm < ActiveRecord::Base
  # Destroys the associated clients and people when the firm is destroyed
  before_destroy { |record| Person.destroy_all "firm_id = #{record.id}"   }
  before_destroy { |record| Client.destroy_all "client_of = #{record.id}" }
end

Observers

The Observer classes let’s you extract the functionality of the callbacks:

class CommentObserver < ActiveRecord::Observer
  def after_save(comment)
    Notifications.deliver_comment("admin@do.com", "New comment was posted", comment)
  end
end

Store observers in app/model/model_observer.rb

Enable observer by putting this in config/environment.rb

config.active_record.observers = :comment_observer, :signup_observer

Migration

ruby sript/generate migration AddTables

Creates a file db/migrations/001_add_tables. The methods “up” and “down” change the db schema

def self.up     # brings db schema to the next version
  create_table :table, :force => true do |t|
    t.column :name, :string
    t.column :age, :integer, { :default => 42 }
    t.column :description, :text
    # :string, :text, :integer, :float, :datetime, :timestamp, :time, :date,
    # :binary, :boolean
  end
  add_column :table, :column, :type
  rename_column :table, :old_name, :new_name
  change_column :table, :column, :new_type
  execute &#8220;SQL Statement&#8221;
  add_index :table, :column, :unique => true, :name => &#8216;some_name&#8217;
  add_index :table, [ :column1, :column2 ]
end

def self.down   # rollbacks changes
  rename_column :table, :new_name, :old_name
  remove_column :table, :column
  drop_table :table
  remove_index :table, :column
end

To execute the migration:

rake db:migrate
rake db:migrate VERSION=14
rake db:migrate RAILS_ENV=production

Unit Test

rake test:units

The following assertions are available:

assert_kind_of Class, @var  # same class
assert @var                 # not nil
assert_equal 1, @p.id       # equality
@product.destroy
assert_raise(ActiveRecord::RecordNotFound) { Product.find( @product.id ) }

Controllers

Controller methods

Each public method in a controller is callable by the (standard) URL scheme /controller/action

class WorldController < ApplicationController
def hello
  render :text => &#8216;Hello world&#8217;
end

Parameters are stored in the params hash:

/world/hello/1?foo=bar
id = params[:id]     # 1
foo = params[:foo]   # bar

Instance variables defined in the the controllers methods are available to the corresponding view templates:

def show
  @person = Person.find( params[:id])
end

Distinguish the type of response accepted:

def index
  @posts = Post.find :all

  respond_to do |type|
    type.html # using defaults, which will render weblog/index.rhtml
    type.xml  { render :action => &#8220;index.rxml&#8221; }
    type.js   { render :action => &#8220;index.rjs&#8221; }
  end
end

Render

Usually the view template with the same name as the controller method is used to render the results

Action

render :action => &#8216;some_action&#8217;   # the default. Does not need to be specified
                                   # in a controller method called &#8220;some_action&#8221;
render :action => &#8216;another_action&#8217;, :layout => false
render :action => &#8216;some_action&#8217;, :layout => &#8216;another_layout&#8217;

Partials

Partials are stored in files called “_subformname” ( _error, _subform, _listitem)

render :partial => &#8216;subform&#8217;
render :partial => &#8216;error&#8217;, :status => 500
render :partial => &#8216;subform&#8217;, :locals => { :variable => @other_variable }
render :partial => &#8216;listitem&#8217;, :collection => @list
render :partial => &#8216;listitem&#8217;, :collection => @list, :spacer_template => &#8216;list_divider&#8217;

Template

Like rendering an action, but finds the template based on the template root (app/views)

render :template => &#8216;weblog/show&#8217;  # renders app/views/weblog/show

File

render :file => &#8216;/path/to/some/file.rhtml&#8217;
render :file => &#8216;/path/to/some/filenotfound.rhtml&#8217;, status => 404, :layout => true

Text

render :text => &#8220;Hello World&#8221;
render :text => &#8220;This is an error&#8221;, :status => 500
render :text => &#8220;Let&#8217;s use a layout&#8221;, :layout => true
render :text => &#8216;Specific layout&#8217;, :layout => &#8216;special&#8217;

Inline Template

Uses ERb to render the “miniature” template

render :inline => &#8221;<%= 'hello , ' * 3 + 'again' %>&#8221;
render :inline => &#8221;<%= 'hello ' + name %>&#8221;, :locals => { :name => &#8220;david&#8221; }

Nothing

render :nothing
render :nothing, :status => 403    # forbidden

RJS

def refresh
  render :update do |page|
    page.replace_html  &#8216;user_list&#8217;, :partial => &#8216;user&#8217;, :collection => @users
    page.visual_effect :highlight, &#8216;user_list&#8217;
  end
end

Change the content-type:

render :action => &#8220;atom.rxml&#8221;, :content_type => &#8220;application/atom+xml&#8221;

URL Routing

In config/routes.rb

map.connect &#8221;, :controller => &#8216;posts&#8217;, :action => &#8216;list&#8217; # default
map.connect &#8216;:action/:controller/:id&#8217;
map.connect &#8216;tasks/:year/:month&#8217;, :controller => &#8216;tasks&#8217;,
                                  :action => &#8216;by_date&#8217;,
                                  :month => nil, :year => nil,
                                  :requirements => {:year => /\d{4}/,
                                                    :month => /\d{1,2}/ }

Filter

Filters can change a request before or after the controller. They can for example be used for authentication, encryption or compression.

before_filter :login_required, :except => [ :login ]
before_filter :autenticate, :only => [ :edit, :delete ]
after_filter :compress

It’s also possible to use a Proc for a really small filter action:

 before_filter { |controller| false if controller.params[&#8220;stop_action&#8221;] }

Change the order of your filters by using prepend_before_filter and prepend_after_filter (like prepend_before_filter :some_filter which will put the some_filter at the beginning of the filter chain)

If you define a filter in a super class, you can skip it in the subclass:

skip_before_filter :some_filter
skip_after_filter :some_filter

Session / Flash

To save data across multiple requests, you can use either the session or the flash hashes. A flash stores a value (normally text) until the next request, while a session stores data during the complete session.

session[:user] = @user
flash[:message] = &#8220;Data was saved successfully&#8221;

<%= link_to "login", :action => &#8216;login&#8217; unless session[:user] %>
<% if flash[:message] %>
<div><%= h flash[:message] %></div>
<% end %>

Session management

It’s possible to turn off session management:

session :off                        # turn session managment off
session :off, :only => :action      # only for this :action
session :off, :except => :action    # except for this action
session :only => :foo,              # only for :foo when doing HTTPS
        :session_secure => true
session :off, :only => :foo,        # off for foo, if uses as Web Service
        :if => Proc.new { |req| req.parameters[:ws] }

Cookies

Setting

cookies[:user_name] = &#8220;david&#8221; # => Will set a simple session cookie
cookies[:login] = { :value => &#8220;XJ-122&#8221;, :expires => Time.now + 3600}
    # => Will set a cookie that expires in 1 hour

Reading

cookies[:user_name] # => &#8220;david&#8221;
cookies.size         # => 2

Deleting

cookies.delete :user_name

All the option symbols for setting cookies are:

  • value – the cookie’s value or list of values (as an array).
  • path – the path for which this cookie applies. Defaults to the root of the application.
  • domain – the domain for which this cookie applies.
  • expires – the time at which this cookie expires, as a +Time+ object.
  • secure – whether this cookie is a secure cookie or not (default to false).
    Secure cookies are only transmitted to HTTPS servers.

Views

View Templates

All view templates are stored in app/views/controllername. The extension determines what kind of template format is used:

  • rhtml Ruby HTML (using ERB)
  • rxml Ruby XML (using Builder)
  • rjs Ruby JavaScript

All instance variables of the controller are available to the view. In addition, the following special objects can be accessed:

  • headers The Headers of the outgoing response
  • request The incoming request object
  • response The outgoing response object
  • params The parameter hash
  • session The session hash
  • controller The current controller

HTML

HTMl mixed with Ruby using tags. All of Ruby is available for programming

<% %>   # executes the Ruby code
<%= %>  # executes the Ruby code and displays the result

<ul>
<% @products.each do |p| %>
  <li><%= h @p.name %></li>
<% end %>
</ul>

The output of anything in <%= %> tags is directly copied to the HTML output stream. To secure against HTML injection, use the h() function to html_escape the output

RXML

Creates XML files

xml.instruct!               # <?xml version="1.0" encoding="UTF-8"?>
xml.comment! &#8220;a comment&#8221;    # <!-- a comment -->
xml.feed &#8220;xmlns&#8221; => &#8220;http://www.w3.org/2005/Atom&#8221; do
  xml.title &#8220;My Atom Feed&#8221;
  xml.subtitle h(@feed.subtitle), &#8220;type&#8221; => &#8216;html&#8217;
  xml.link url_for( :only_path => false,
                    :controller => &#8216;feed&#8217;,
                    :action => &#8216;atom&#8217; )
  xml.updated @updated.iso8601
  xml.author do
    xml.name &#8220;Jens-Christian Fischer&#8221;
    xml.email &#8220;jcfischer@gmail.com&#8221;
  end
  @entries.each do |entry|
    xml.entry do
      xml.title entry.title
      xml.link &#8220;href&#8221; => url_for ( :only_path => false,
                                   :controller => &#8216;entries&#8217;,
                                   :action => &#8216;show&#8217;,
                                   :id => entry )
      xml.id entry.urn
      xml.updated entry.updated.iso8601
      xml.summary h(entry.summary)
    end
  end
end

for more details see: http://rubyforge.org/projects/builder/

RJS

In addition to HTML and XML templates, Rails also understands JavaScript Templates. They allow you to easily create complex alterations of the displayed page. You can manipulate a page element with the following methods:

select Select a DOM element for further processing

page.select(&#8216;pattern&#8217;) # selects an item on the page through a CSS pattern
                       # select(&#8216;p&#8217;), select(&#8216;p.welcome b&#8217;)
page.select(&#8216;div.header em&#8217;).first.hide
page.select(&#8216;#items li&#8217;).eacj do |value|
  value.hide
end

insert_html Inserts content into the DOM at a specific position

page.insert_html :position, id, content

position can be one of the following:

  • :top
  • :bottom
  • :before
  • :after

Examples:

page.insert_html :bottom, &#8216;list&#8217;, &#8217;<li>last item</li>&#8217;
page.insert_html :before, &#8216;tasks&#8217;, :partial => &#8216;task&#8217;

replace_html Replaces the innerHTML of the specified DOM element

page.replace_html &#8216;title&#8217;, &#8220;This is the new title&#8221;
page.replace_html &#8216;person-45&#8217;, :partial => &#8216;person&#8217;, :object => @person

replace Replaces the “outer HTML”, (i.e. the entire element) of the specified DOM element

page.replace &#8216;task&#8217;, :partial => &#8216;task&#8217;, :object => @task

remove Removes the specified DOM element

page.remove &#8216;edit-button&#8217;

hide Hides the specified DOM element

page.hide &#8216;some-element&#8217;

show Shows the specified DOM element

page.show &#8216;some-element&#8217;

toggle Toggle the visibility of a DOM element

page.toggle &#8216;some-element&#8217;

alert Display an alert box

page.alert &#8216;Hello world&#8217;

redirect_to Redirects the browser to a given location

page.redirect_to :controller => &#8216;blog&#8217;, :action => &#8216;show&#8217;, :id => @post

call Calls another JavaScript function

page.call foo, 1, 2

assign Assigns a value to a JS variable

page.assign &#8220;foo&#8221;, 42

<< Writes raw JavaScript to the page

page << "alert('hello world);"

delay Delays the code in the block by a number of seconds

page.delay(10) do
   page.visual_effect :fade, 'notice'
end

visual_effect Calls a Scriptaculous effect

page.visual_effect :highlight, 'notice', :duration => 2

sortable Create a sortable element

page.sortable &#8216;my_list&#8217;, :url => { :action => &#8216;order&#8217; }

dragable Create a dragable element

page.dragable &#8216;my_image&#8217;, :revert => true

drop_receiving Create an element for receiving drops

page.drop_recieving &#8216;my_cart&#8217;, :url => { :controller => &#8216;cart&#8217;, :action => &#8216;add&#8217; }

Helpers

Small functions, usually used for displaying data, can be extracted to helpers. Each view has it’s own helper class (in app/helpers). Common functionality is stored in app/helpers/application_helper.rb

Links

link_to &#8220;Name&#8221;, :controller => &#8216;post&#8217;, :action => &#8216;show&#8217;, :id => @post.id
link_to &#8220;Delete&#8221;, { :controller => &#8220;admin&#8221;,
  :action => &#8220;delete&#8221;,
  :id => @post },
{ :class => &#8216;css-class&#8217;,
  :id => &#8216;css-id&#8217;,
  :confirm => &#8220;Are you sure?&#8221; }

image_tag &#8220;spinner.png&#8221;, :class => &#8220;image&#8221;, :alt => &#8220;Spinner&#8221;

mail_to &#8220;info@invisible.ch&#8221;, &#8220;send mail&#8221;,
      :subject => &#8220;Support request by #{@user.name}&#8221;,
        :cc => @user.email,
        :body => &#8216;&#8230;.&#8217;,
        :encoding => &#8220;javascript&#8221;

stylesheet_link_tag &#8220;scaffold&#8221;, &#8220;admin&#8221;, :media => &#8220;all&#8221;

HTML Forms

Form

<%= form_tag { :action => :save }, { :method => :post } %>

creates a form tag with the specified action, makes it a post request.

Use :multipart => true to define a Mime-Multipart form (for file uploads)

Text fields

<%= text_field :modelname, :attribute_name, options  %>

creates a text input field of the form:

<input type="text" name="modelname[attribute_name]" id="attributename" />

Example:

text_field &#8220;post&#8221;, &#8220;title&#8221;, &#8220;size&#8221; => 20
    <input  type="text" id="post_title" name="post[title]"
            size="20" value="#{@post.title}" />

<%= hidden_field ... %>

creates a hidden field

<%= password_field ... %>

creates a password field (all input shown as stars)

<%= file_field ... %>

creates a file field

Textarea

<%= text_area ... %>

creates a text area. Example:

text_area &#8220;post&#8221;, &#8220;body&#8221;, &#8220;cols&#8221; => 20, &#8220;rows&#8221; => 40
    <textarea cols="20" rows="40" id="post_body" name="post[body]">
        #{@post.body}
    </textarea>

Radio Button

<%= radio_button :modelname, :attribute, :tag_value, options %>

creates a radio button.

Example:

radio_button &#8220;post&#8221;, &#8220;category&#8221;, &#8220;rails&#8221;
radio_button &#8220;post&#8221;, &#8220;category&#8221;, &#8220;java&#8221;
    <input type="radio" id="post_category" name="post[category]" value="rails"
           checked="checked" />
    <input type="radio" id="post_category" name="post[category]" value="java" />

Check Box

<%= check_box :modelname, :attribute, options, on_value, off_value %>

Example:

check_box &#8220;post&#8221;, &#8220;validated&#8221;   # post.validated? returns 1 or 0
    <input type="checkbox" id="post_validate" name="post[validated]"
           value="1" checked="checked" />
    <input name="post[validated]" type="hidden" value="0" />

check_box &#8220;puppy&#8221;, &#8220;gooddog&#8221;, {}, &#8220;yes&#8221;, &#8220;no&#8221;
    <input type="checkbox" id="puppy_gooddog" name="puppy[gooddog]" value="yes" />
    <input name="puppy[gooddog]" type="hidden" value="no" />

Options

Create a select tag. Pass an array of choices

<%= select :variable, :attribute, choices, options, html_options %>

select  &#8220;post&#8221;,
        &#8220;person_id&#8221;,
        Person.find_all.collect {|p| [ p.name, p.id ] },
        { :include_blank => true }

 <select name="post[person_id]">
   <option></option>
   <option value="1" selected="selected">David</option>
   <option value="2">Sam</option>
   <option value="3">Tobias</option>
 </select>

<%= collection_select :variable, :attribute, choices, :id, :value %>

Date Time

<%= date_select :variable, :attribute, options %>
<%= datetime_select :variable, :attribute, options %>

Examples:

date_select &#8220;post&#8221;, &#8220;written_on&#8221;
date_select &#8220;user&#8221;, &#8220;birthday&#8221;, :start_year => 1910
date_select &#8220;user&#8221;, &#8220;cc_date&#8221;, :start_year => 2005,
                               :use_month_numbers => true,
                               :discard_day => true,
                               :order => [:year, :month]

datetime_select &#8220;post&#8221;, &#8220;written_on&#8221;

End Form Tag

<%= end_form_tag %>

Layouts

A layout defines the surroundings of an HTML page. It’s the place to define common look & feel. Layouts live in app/views/layouts

<html>
  <head>
    <title>Form: <%= controller.action_name %></title>
    <%= stylesheet_link_tag 'scaffold' %>
  </head>
  <body>
    <%= yield %>   # the content will show up here
  </body>
</html>

&#8212;-

class MyController < ApplicationController
  layout "standard", :except => [ :rss, :atom ]
&#8230;
end

&#8212;-

class MyOtherController < ApplicationController
  layout :compute_layout

  # this method computes the name of the layout to use
  def compute_layout
    return "admin" if session[:role] == "admin"
    "standard"
  end
  ...
end

Layouts have access to the instance variables of the controller so you can pass values “up”

Partials

Partials are building blocks for creating views. They allow re-use of commonly used display blocks. They are stored in files:

render :partial => &#8216;product&#8217;

loads the partial in _form.rthml and passed the instance variable @product to it. The partial can access it using @product

render :partial => &#8216;product&#8217;, :locals => { :product => @bought }

loads the same partial but assigns a different instance variable to it.

render :partial => &#8216;product&#8217;, :collection => @product_list

renders the partial for each element in @product_list and assigns @product to each element. An iteration counter will automatically be made available to the template with a name of the form partial_name_counter (in the above example: product_counter).

Components

To reuse both controller logic and views, use them as “components”

render_component :controller => &#8216;posts&#8217;, :action => &#8216;last_posts&#8217;

That calls last_posts in the PostsController. Use

render :layout => false, &#8230;

or

layout &#8220;xxx&#8221;, :except => &#8216;last_posts&#8217;

to render this action without a layout

Functional Testing

rake test:functional

Requests

get :action # a get request of the specificed action
get :action, :id => 1,
         { session_hash }, # optional session variables
         { flash_hash }    # optional messages in the flash

post :action, :foo => { :value1 => &#8216;abc&#8217;, :value2 => &#8216;123&#8217; },
              { :user_id => 17 },
              { :message => &#8216;success&#8217; }

get, post, put, delete, head

assert_response :success
# possible parameters are:
#   :success
#   :redirect
#   :missing
#   :error

Redirects

assert_redirected_to :action => :other_action
assert_redirected_to :controller => &#8216;foo&#8217;, :action => &#8216;bar&#8217;
assert_redirected_to http://www.invisible.ch

Rendered with template

assert_template &#8220;post/index&#8221;

Variable assignments

assert_nil assigns(:some_variable)
assert_not_nil assigns(:some_variable)
assert_equal 17, assigns(:posts).size

Rendering of specific tags

assert_tag :tag => &#8216;body&#8217;
assert_tag :content => &#8216;Rails Seminar&#8217;
assert_tag :tag => &#8216;div&#8217;, :attributes => { :class => &#8216;index_list&#8217; }
assert_tag :tag => &#8216;head&#8217;, :parent => { :tag => &#8216;body&#8217; }
assert_tag :tag => &#8216;html&#8217;, :child => { :tag => &#8216;head&#8217; }
assert_tag :tag => &#8216;body&#8217;, :descendant => { :tag => &#8216;div&#8217; }
assert_tag :tag => &#8216;ul&#8217;,
           :children => { :count => 1..3,
                      :only => { :tag => &#8216;li&#8217; } }

AJAX

Be sure to include the javascript libraries in the layout

<%= javascript_include_tag :defaults %>

Linking to remote action

<%= link_to_remote "link", :update => &#8216;some_div&#8217;,
                           :url => { :action => &#8216;show&#8217;, :id => post.id } %>

<%= link_to_remote "link", :url => { :action => &#8216;create&#8217;,
                           :update => { :success => &#8216;good_div&#8217;,
                                        :failure => &#8216;error_div&#8217; },
                           :loading => &#8216;Element.show(&#8216;spinner&#8217;),
                           :complete => &#8216;Element.hide(&#8216;spinner&#8217;) } %>

Callbacks

:loading        Called when the remote document is being loaded with data
                by the browser.
:loaded         Called when the browser has finished loading the remote document.
:interactive    Called when the user can interact with the remote document,
                even though it has not finished loading.
:success        Called when the XMLHttpRequest is completed, and the HTTP
                status code is in the 2XX range.
:failure        Called when the XMLHttpRequest is completed, and the HTTP
                status code is not in the 2XX range.
:complete       Called when the XMLHttpRequest is complete (fires after
                success/failure if they are present).

You can also specifiy reactions to return codes directly:

link_to_remote word,
    :url => { :action => &#8220;action&#8221; },
    404 => &#8220;alert(&#8216;Not found&#8230;? Wrong URL&#8230;?&#8217;)&#8221;,
    :failure => &#8220;alert(&#8216;HTTP Error &#8217; + request.status + &#8216;!&#8217;)&#8221;

AJAX Forms

Create a form that will submit via an XMLHttpRequest instead of a POST request. The parameters are passed exactly the same way (so the controller can use the params method to access the parameters). Fallback for non JavaScript enabled browsers can be specified by using the :action methods in the :html option.

form_remote_tag :html => { :action => url_for(:controller => &#8216;controller&#8217;,
                                              :action => &#8216;action&#8217;),
                           :method => :post }

Autocompleting textfield

In View:

<%= text_field_with_auto_complete :model, :attribute %>

In Controller:

auto_complete_for :model, :attribute

Observe Field

<label for="search">Search term:</label>
<%= text_field_tag :search %>
<%= observe_field(:search,
                  :frequency => 0.5,
                  :update => :results,
                  :url => { :action => :search }) %>
<div id="results"></div>

Optionally specify:

:on => :blur    # trigger for event (default :changed or :clicked)
:with => &#8230;    # a JavaScript expression to specify what value is sent
                # defaults to &#8220;value&#8221;
:with => &#8216;bla&#8217;  # &#8220;&#8216;bla&#8217; = value&#8221;
:with => &#8216;a=b&#8217;  # &#8220;a=b&#8221;

Observe Form

Same semantics as observe_field

Periodically call Remote

<%= periodically_call_remote(:update => &#8216;process-list&#8217;,
                             :url => { :action => :ps },
                             :frequency => 2 ) %>

Configuring your application

A lot of things can be configured in the config/environment.rb file. This list is not exhaustive:

Session configuration

config.action_controller.session_store = :active_record_store
# one of :active_record_store, :drb_store,
# :mem_cache_store, or :memory_store or your own class


ActionController::Base.session_options[:session_key] = &#8216;my_app&#8217;
    # use an application specific session_key
ActionController::Base.session_options[:session_id] = &#8216;12345&#8217;
    # use this session_id. Will be created if not specified
ActionController::Base.session_options[:session_expires] = 3.minute.from_now
    # how long before a session expires?
ActionController::Base.session_options[:new_session] = true
    # force the creation of a new session
ActionController::Base.session_options[:session_secure] = true
    # only use sessions over HTTPS
ActionController::Base.session_options[:session_domain] = &#8216;invisible.ch&#8217;
    # Specify which domain this session is valid for (default: hostname of server)
ActionController::Base.session_options[:session_path] = &#8216;/my_app&#8217;
    # the path for which this session applies.  Defaults to the
    # directory of the CGI script

Caching configuration

ActionController::Base.fragment_cache_store = :file_store, &#8220;/path/to/cache/directory&#8221;

Appendix

Sources

  • Agile Web Development with Rails
  • The Rails-Users mailing list
  • The Rails Source code

License

Part of the course materials for the Ruby On Rails Workshop by InVisible GmbH.

InVisible GmbH
Langgrütstrasse 172
8047 Zürich
+41 44 401 09 30

http://www.invisible.ch
mailto:info@invisible.ch

Creative Commons License
Dieser Inhalt ist unter einer Creative Commons-Lizenz lizenziert.


update: This version of the reference is from May 06. You may find an updated version on InVisible

Arghhhhh! The path to ruby lib is wrong!

nanoRAILS was down for the past 12h because of a setup change on my host on DreamHost.

Suddenly, the link /usr/local/lib/ruby was changed to point to an incorrect location, so instead of having the ruby libraries under /usr/local/lib/ruby/1.8, they would effectively be under /usr/local/lib/ruby/ruby/1.8 :(

Suffice it to say that things don’t work too well after that.

Running dispatch.fgci by hand revealed that “require pathname” fails. Hmmm, that’s not supposed to happen! That when I realized the above mentioned link had been changed just a few hours before.

After tinkering some more, and trying a few options, I managed to put a kludge together till the link is put back in the right place.

In the public directory, I created a myruby script:

#!/bin/bash
export RUBYLIB=/usr/local/lib/ruby/ruby/1.8/:/usr/local/lib/ruby/ruby/1.8/i386-linux/
/usr/bin/ruby $*

Make sure that script is executable (chmod +x myruby)

then in dispatch.fcgi, I replaced the first line with:

#!/usr/bin/env [PATH TO YOUR RAILS APP]/public/myruby

Of course, this will likely break once the link is restored to its correct value.

You’ve got to love using a shared host!

Update: ruby setup is back to normal now. At least I learned something in the process.
Everyone that was inconvenienced by this outage, please accept my apologies.

Caching ads from TextLinkAds in rails

In the first part, I explained how you could
Display ads from TextLinkAds in a rails application.
This created the basis for today’s addition: caching.

You know that the ads won’t change that often, and saving your bandwith and CPU cycle (and TextLinkAds too) is not too much to ask.

One way to achieve that is to use the fragment cache provided by Ruby on Rails. It does not however provide expiration dates. To add expiration, you can use 2 related elements, one for storing the expiration, one to store the actual data.

Firt you need to generate the names of the 2 keys:

def fragment_key(name)
  return &#8220;TLA/TIME/#{name}&#8221;, &#8220;TLA/DATA/#{name}&#8221;
end

and here, the logic to check whether the cache is present, and has not expired.

def content
  url = &#8220;http://www.text-link-ads.com/xml.php?inventory_key=&#8221;+@sb_config[&#8216;key&#8217;]+&#8221;&referer=&#8221;+CGI::escape(@request.env[&#8216;REQUEST_URI&#8217;])
  agent = &#8220;&user_agent=&#8221;+CGI::escape(@request.env[&#8216;HTTP_USER_AGENT&#8217;])
  url_time, url_data = fragment_key(url)

  #is it time to update the cache?
  time = read_fragment(url_time)
  if (time == nil) || (time.to_time < Time.now)
    @links = request(url+agent) rescue nil
    #if we can get the latest, then update the cache
    if @links != nil
      expire_fragment(url_time)
      expire_fragment(url_data)
      write_fragment(url_time, Time.now+6.hour)
      write_fragment(url_data, @links)
    else
      #otherwise try again in 1 hour
      write_fragment(url_time, Time.now+1.hour)
      @links = read_fragment(url_data)
    end
  else
    #use the cache
    @links = read_fragment(url_data)
  end
end

In case the request to TextLinkAds fails (@links is nil), for whatever reason, you keep the cache for one extra hour till you make an other attempt.

And to make the code complete, here are the needed files to include and other needed helper functions:

require 'net/http'
require 'cgi'

def request(url)
  XmlSimple.xml_in(http_get(url))
end

# Does an HTTP GET on a given URL and returns the response body
def http_get(url)
  Net::HTTP.get_response(URI.parse(url)).body.to_s
end

So this takes care of caching the calls to TextLinkAds. You may not be done, though. Depending on the app you use, and its caching strategy, you may have another problem to solve. Your app may be caching your pages and actions, which may cause your links from TextLinkAds never to be updated. One solution is to use an approach similar to the one used by typo as described by Scott Laird and use caches_action_with_params from *scottstuff*.

This can wrap any method in your controller, and provide you the ability to control the longevity of your application’s cache simply by setting the lifetime value in the response:

response.lifetime = 6.hour

So for an application like typo, the code would be:

def content
  response.lifetime = 6.hour
  url = "http://www.text-link-ads.com/xml.php?inventory_key="+@sb_config['key']+"&referer="+CGI::escape(@request.env['REQUEST_URI'])
  agent = "&user_agent="+CGI::escape(@request.env['HTTP_USER_AGENT'])
  url_time, url_data = fragment_key(url)

  #is it time to update the cache?
  time = read_fragment(url_time)
  if (time == nil) || (time.to_time < Time.now)
    @links = request(url+agent) rescue nil
    #if we can get the latest, then update the cache
    if @links != nil
      expire_fragment(url_time)
      expire_fragment(url_data)
      write_fragment(url_time, Time.now+6.hour)
      write_fragment(url_data, @links)
    else
      #otherwise try again in 1 hour
      write_fragment(url_time, Time.now+1.hour)
      @links = read_fragment(url_data)
    end
  else
    #use the cache
    @links = read_fragment(url_data)
  end
end

As time permits, I’ll be posting my sidebar plugin for typo to provide a nice UI to set your TextLinkAds account and referral id.

Text Link Ads

readable output in rails script/breakpointer

After hours spent in breakpointer struggling to make sense of the output, I figured there had to be a better way to look at a stack trace than what the default output provides:

irb(ArticlesController):007:0> caller
=> [&#8220;./vendor/rails/railties/lib/breakpoint.rb:512:in `breakpoint&#8217;&#8221;, &#8220;./vendor/rails/railties/lib/breakpoint.rb:512:in `breakpoint&#8217;&#8221;, &#8220;./vendor/rails/actionpack/lib/action_controller/caching.rb:510:in `cache_sweeper&#8217;&#8221;, &#8220;./app/controllers/articles_controller.rb:7&#8221;, &#8230;]

Well, after some research, I found at least 4! And they work for any data structure, not just for stack traces, but I’m a pretty happy camper just with cleaner stack traces!

Solution #1
Building on Using the standard output in breakpointer, you can use each to get a more decent output.

caller.each { |x|  client.puts x }

which returns:

./vendor/rails/railties/lib/breakpoint.rb:512:in `breakpoint&#8217;
./vendor/rails/actionpack/lib/action_controller/caching.rb:510:in `cache_sweeper&#8217;
&#8230;

Solution #2
Use PrettyPrint

client.require &#8216;pp&#8217;
client.pp caller

Solution #3
Use YAML

client.require &#8216;yaml&#8217;
client.y caller

Solution #4
Use to_yaml

client.puts caller.to_yaml

These methods can also be used to display any complex data.

Try it on the request object for example.

To avoid having to type the require each time, add to .irbrc:

require &#8216;yaml&#8217;
require &#8216;pp&#8217;

Using the standard output in script/breakpointer

When you use script/breakpointer, once you have stopped in irb, if you try using print, puts or some other way to display something, your ouput goes to your main rails output, not to irb, which is not quite convenient.

First, it took me a while to realize where the output was in fact going. I guessed I was not too quick on that one.

Second, even knowing where to look, I did not find this solution very satisfying.

It turns out there is a solution. the client variable can help you use the right output

client.print &#8220;hello\n&#8221;

will output:

hello
=> nil

Works the same for puts.